Showing posts with label WEBLOGIC. Show all posts

WebLogic Server Patching 10.3.6 - SU Patch [FMJJ] 26519424


# Weblogic Environment

export MW_HOME=/u01/app/oracle/product/fmw11g
export WLS_HOME=$MW_HOME/wlserver_10.3
export WL_HOME=$WLS_HOME
export JAVA_HOME=/usr/lib/jvm/java-1.6.0-openjdk-1.6.0.41.x86_64
export PATH=$JAVA_HOME/bin:$PATH


Applying Patch Set Updates (PSUs)The patch set updates (PSUs) come with a "README.txt" file that explains how to apply the patches. You should always follow the patch note, but the basic format is typically as follows.Unzip the patch into the correct location.
[oracle@XXXXXXX tmp]$  unzip p26519424_1036_Generic.zip -d $MW_HOME/utils/bsu/cache_dir
Archive:  p26519424_1036_Generic.zip
 extracting: /u01/app/oracle/product/fmw11g/utils/bsu/cache_dir/FMJJ.jar
  inflating: /u01/app/oracle/product/fmw11g/utils/bsu/cache_dir/patch-catalog_25504.xml
  inflating: /u01/app/oracle/product/fmw11g/utils/bsu/cache_dir/README.txt

[oracle@xxxx ]$ ls -l $MW_HOME/utils/bsu/cache_dir
total 165800
-rw-r--r--. 1 oracle oinstall 90860993 Sep 12 15:15 FMJJ.jar
-rw-r--r--. 1 oracle oinstall 78902955 Sep  5 02:08 patch-catalog_25504.xml
-rw-rw-r--. 1 oracle oinstall     8741 Oct 12 04:39 README.txt

[oracle@XXXXXXX cache_dir]$Apply the patch.
$ cd $MW_HOME/utils/bsu
$ [oracle@XXXXXXX bsu]$ ./bsu.sh -install -patch_download_dir=$MW_HOME/utils/bsu/cache_dir -patchlist=FMJJ -prod_dir=$WLS_HOME -log=/tmp/weblogic_patching.log
Exception in thread "Main Thread" java.lang.OutOfMemoryError
Solution : Edit the bsu.cmd and increase the JVM to something like below.
-Xms1024m –Xmx2048m
[oracle@XXXXXXX bsu]$ ./bsu.sh -install -patch_download_dir=$MW_HOME/utils/bsu/cache_dir -patchlist=FMJJ -prod_dir=$WLS_HOME -log=/tmp/weblogic_patching.log
Checking for conflicts...
No conflict(s) detected

Installing Patch ID: FMJJ
..
Result: Success

If you get conflicts, you may have to remove previous patches, before attempting to apply the patch again.
[oracle@xxxxxxxxx bsu]$ ./bsu.sh -install -patch_download_dir=$MW_HOME/utils/bsu/cache_dir -patchlist=FMJJ -prod_dir=$WLS_HOME -log=/tmp/weblogic_patching.log
Checking for conflicts........
Conflict(s) detected - resolve conflict condition and execute patch installation again
Conflict condition details follow:
Patch FMJJ is mutually exclusive and cannot coexist with patch(es): B25A
[oracle@FCISCOSTBAPP1 bsu]$

[oracle@xxxxxxxx bsu]# ./bsu.sh -remove -patchlist=B25A -prod_dir=$WLS_HOME -log=/tmp/weblogic_patching.log
Checking for conflicts......
No conflict(s) detected

Removing Patch ID: B25A.
Result: Success


[oracle@xxxxxxxxx bsu]# ./bsu.sh -install -patch_download_dir=/u01/app/oracle/Middleware/utils/bsu/cache_dir -patchlist=FMJJ -prod_dir=/u01/app/oracle/Middleware/wlserver_10.3/ -log=/tmp/weblogic_patching.log
Checking for conflicts......
No conflict(s) detected

Installing Patch ID: FMJJ..
Result: Success
After the patch is successfully applied, restart all WebLogic servers.
Check the version.

[oracle@xxxxxx bsu]$ . $WLS_HOME/server/bin/setWLSEnv.sh
CLASSPATH=/u01/app/oracle/product/fmw11g/patch_wls1036/profiles/default/sys_manifest_classpath/weblogic_patch.jar:/u01/app/oracle/product/fmw11g/patch_ocp371/profiles/default/sys_manifest_classpath/weblogic_patch.jar:/u01/app/oracle/jdk1.8.0_45/lib/tools.jar:/u01/app/oracle/product/fmw11g/wlserver_10.3/server/lib/weblogic_sp.jar:/u01/app/oracle/product/fmw11g/wlserver_10.3/server/lib/weblogic.jar:/u01/app/oracle/product/fmw11g/modules/features/weblogic.server.modules_10.3.6.0.jar:/u01/app/oracle/product/fmw11g/wlserver_10.3/server/lib/webservices.jar:/u01/app/oracle/product/fmw11g/modules/org.apache.ant_1.7.1/lib/ant-all.jar:/u01/app/oracle/product/fmw11g/modules/net.sf.antcontrib_1.1.0.0_1-0b2/lib/ant-contrib.jar:

PATH=/u01/app/oracle/product/fmw11g/wlserver_10.3/server/bin:/u01/app/oracle/product/fmw11g/modules/org.apache.ant_1.7.1/bin:/u01/app/oracle/jdk1.8.0_45/jre/bin:/u01/app/oracle/jdk1.8.0_45/bin:/usr/lib/jvm/java-1.6.0-openjdk-1.6.0.41.x86_64/bin:/usr/lib/jvm/java-1.6.0-openjdk-1.6.0.41.x86_64/bin:/usr/lib64/qt-3.3/bin:/usr/local/bin:/bin:/usr/bin:/usr/local/sbin:/usr/sbin:/sbin

Your environment has been set.
[oracle@xxxxx bsu]$ java weblogic.version

WebLogic Server 10.3.6.0.171017 PSU Patch for BUG26519424 TUE SEP 12 18:34:42 IST 2017
WebLogic Server 10.3.6.0  Tue Nov 15 08:52:36 PST 2011 1441050

Use 'weblogic.version -verbose' to get subsystem information

Use 'weblogic.utils.Versions' to get version information for all modules
[oracle@xxxxxx bsu]$

List running Weblogic servers and Node Managers

#!/bin/bash
# ---------------------------------------------------------------------------
# listWebLogicServers.sh - List running WebLogic Servers and Node Managers
# Peter Lorenzen
# Version 0.9
# ---------------------------------------------------------------------------
DOMAIN_DIRECTORY="domains"
echo "################################################################################"
echo "# WebLogic Servers"
echo "# <owner>  <domain>  <server>  <pid>  <ports>"
echo "################################################################################"
ps -ef | grep "[D]weblogic.Name="|while read tmp
do
  owner=`echo $tmp | awk '{ print $1 }'`
  webLogicServer=`echo $tmp | grep -oP "(?<=Dweblogic.Name=)[^ ]+"`
  pid=`echo $tmp | awk '{ print $2 }'`
  port=`echo $tmp | netstat -tlpn 2>/dev/null | grep $pid | awk '{ print $4 }' | tr '\n' ',' | tr ' ' ',' | grep -o ":....," | sort -u | tr -d '\n' | tr -d ':' | sed 's/,$//'`
  if [ -z "$port" ]; then
    port="null"
  fi
  domain=`echo $tmp | grep -oP "(?<=BootIdentityFile=)[^ ]+"`
  domain=`echo $domain | grep -oP "(?<=$DOMAIN_DIRECTORY/)[^ ]+" | cut -d/ -f1`
  if [ -n "$1" ]; then
    echo "$owner $domain $webLogicServer $pid $port kill -9 $pid"
  else 
    echo "$owner $domain $webLogicServer $pid $port"
  fi
done|sort|column -t
echo
echo "################################################################################"
echo "# Node Managers"
echo "# <owner>  <mw_home>  <pid>  <port>"
echo "################################################################################"
ps -ef | grep "[w]eblogic.NodeManager"|while read tmp
do
  owner=`echo $tmp | awk '{ print $1 }'`
  pid=`echo $tmp | awk '{ print $2 }'`
  port=`echo $tmp | netstat -tlpn 2>/dev/null | grep $pid | awk '{ print $4 }' | tr '\n' ',' | tr ' ' ',' | grep -o ":....," | sort -u | tr -d '\n' | tr -d ':' | sed 's/,$//'`
  if [ -z "$port" ]; then
    port="null"
  fi
  mw_home=`echo $tmp | grep -oP "(?<=bea.home=)[^ ]+"`
  if [ -n "$1" ]; then
    echo "$owner $mw_home $pid $port kill -9 $pid"
  else 
    echo "$owner $mw_home $pid $port"
  fi
done|sort|column -t


OUTPUT:

################################################################################
# WebLogic Servers
# <owner>  <domain>  <server>  <pid>  <ports>
################################################################################
oracle  AdminServer  3383       7013
oracle  GCDomain     EMGC_OMS1  15149      7301
root    AdminServer  30664      7007
root    AdminServer  58600      7004
root    AdminServer  59677      5060,7001
root    AdminServer  59902      7012

################################################################################
# Node Managers
# <owner>  <mw_home>  <pid>  <port>
################################################################################
oracle  14819  7403


Weblogic Threadpool has stuck threads

ERROR:  
<BEA-000337><[STUCK] ExecuteThread: '15' for queue: 'weblogic.kernel.Default (self-tuning)' has been busy for "652" seconds working on the request.

Weblogic Threadpool has stuck threads


Solution: Stop and start the apex deployment in Weblogic


Reset the WebLogic Admin Server password


How to reset the WebLogic Admin Server password

Set the following environment variables (updating the <domain_name> as appropriate):
export MW_HOME=/u01/app/oracle/product/middleware
export DOMAIN_HOME=$MW_HOME/user_projects/domains/<domain_name>
export CLASSPATH=$CLASSPATH:$MW_HOME/wlserver_10.3/server/lib/weblogic.jar
. $DOMAIN_HOME/bin/setDomainEnv.sh
Shutdown your WebLogic domain:
$DOMAIN_HOME/bin/stopWebLogic.sh
Rename and backup the DefaultAuthenticatorInit.ldift file:
cd $DOMAIN_HOME/security
mv DefaultAuthenticatorInit.ldift DefaultAuthenticatorInit.ldift.old
Now run the following to generate a new DefaultAuthenticatorInit.ldift file (where ‘weblogic’ is default username):
java weblogic.security.utils.AdminAccount <username> <new_password> .
NOTE: Don’t forget the period “.” at the end of this command, otherwise you’ll get “Error: Invalid arguments”.
Rename and backup the following LDAP directory:
mv $DOMAIN_HOME/servers/AdminServer/data/ldap $DOMAIN_HOME/servers/AdminServer/data/ldap.old
(This LDAP directory will be recreated next time the WebLogic Admin server starts up).
Edit the boot.properties file and update the password with the one you used above:
cd $DOMAIN_HOME/servers/AdminServer/security
cp boot.properties properties.old

vi boot.properties
password=<username>
username=<new_password>
Repeat this for any Managed Servers in the domain with a boot.properties file. The clear text password will be encrypted next time the server starts.
Now restart your WebLogic Domain:
$DOMAIN_HOME/startWebLogic.sh
Now you should be able to log into your WebLogic console!

WebLogic Server Patching 10.3.6 - SU Patch [UIAL] 23094342

# Weblogic Environment
export MW_HOME=/u01/app/oracle/product/middleware
export WLS_HOME=$MW_HOME/wlserver_10.3
export WL_HOME=$WLS_HOME
export JAVA_HOME=/u01/app/oracle/jrockit-jdk1.6.0_45-R28.2.7-4.1.0
export PATH=$JAVA_HOME/bin:$PATH

Applying Patch Set Updates (PSUs)The patch set updates (PSUs) come with a "README.txt" file that explains how to apply the patches. You should always follow the patch note, but the basic format is typically as follows.Unzip the patch into the correct location.
[oracle@XXXXXXX tmp]$ mkdir -p $MW_HOME/utils/bsu/cache_dir
[oracle@XXXXXXX tmp]$ cd $MW_HOME/utils/bsu/cache_dir
[oracle@XXXXXXX cache_dir]$ ll
-rw-r--r--. 1 oracle oinstall 91259809 Aug 23 09:28 p23094342_1036_Generic.zip
[oracle@XXXXXXX cache_dir]$ unzip p23094342_1036_Generic.zip
Archive:  p23094342_1036_Generic.zip
  inflating: patch-catalog_24122.xml
  inflating: UIAL.jar
  inflating: README.txt
[oracle@XXXXXXX cache_dir]$Apply the patch.
$ cd $MW_HOME/utils/bsu
$ [oracle@XXXXXXX bsu]$ ./bsu.sh -install -patch_download_dir=$MW_HOME/utils/bsu/cache_dir -patchlist=UIAL -prod_dir=$WLS_HOME -log=/tmp/weblogic_patching.log
Exception in thread "Main Thread" java.lang.OutOfMemoryError
Solution : Edit the bsu.cmd and increase the JVM to something like below.
-Xms1024m –Xmx2048m
[oracle@XXXXXXX bsu]$ ./bsu.sh -install -patch_download_dir=$MW_HOME/utils/bsu/cache_dir -patchlist=UIAL -prod_dir=$WLS_HOME -log=/tmp/weblogic_patching.log
Checking for conflicts...
No conflict(s) detected

Installing Patch ID: UIAL..
Result: Success

If you get conflicts, you may have to remove previous patches, before attempting to apply the patch again.
[root@xxxxxxxxx bsu]#./bsu.sh -install -patch_download_dir=/u01/app/oracle/Middleware/utils/bsu/cache_dir -patchlist=UIAL -prod_dir=/u01/app/oracle/Middleware/wlserver_10.3/ -log=/tmp/weblogic_patching.log
Checking for conflicts......
Conflict(s) detected - resolve conflict condition and execute patch installation again
Conflict condition details follow:
Patch UIAL is mutually exclusive and cannot coexist with patch(es): SRUM,6D9T

[root@xxxxxxxx bsu]# ./bsu.sh -remove -patchlist=SRUM -prod_dir=/u01/app/oracle/Middleware/wlserver_10.3/
Checking for conflicts......
No conflict(s) detected

Removing Patch ID: SRUM.
Result: Success

[root@xxxxxxxxx bsu]# ./bsu.sh -remove -patchlist=6D9T -prod_dir=/u01/app/oracle/Middleware/wlserver_10.3/
Checking for conflicts......
No conflict(s) detected

Removing Patch ID: 6D9T.
Result: Success

[root@xxxxxxxxx bsu]# ./bsu.sh -install -patch_download_dir=/u01/app/oracle/Middleware/utils/bsu/cache_dir -patchlist=UIAL -prod_dir=/u01/app/oracle/Middleware/wlserver_10.3/ -log=/tmp/weblogic_patching.log
Checking for conflicts......
No conflict(s) detected

Installing Patch ID: UIAL..
Result: Success
After the patch is successfully applied, restart all WebLogic servers.
Check the version.

$ . $WLS_HOME/server/bin/setWLSEnv.sh
$ java weblogic.version

WebLogic Server 10.3.6.0.3 PSU Patch for BUG14736139 Fri Nov 23 10:16:54 IST 2012
WebLogic Server 10.3.6.0  Tue Nov 15 08:52:36 PST 2011 1441050
Use 'weblogic.version -verbose' to get subsystem information
Use 'weblogic.utils.Versions' to get version information for all modules
$

WEBLOGIC CLUSTERING

WEBLOGIC CLUSTER ON 2 PHYSICAL SERVERS
Setup Weblogic on both Nodes
The following actions should be performed by the "root" user.
Make sure the "/etc/hosts" file contains correct entries for both the "localhost" and real host names.
127.0.0.1   localhost localhost.localdomain localhost4 localhost4.localdomain4
::1         localhost localhost.localdomain localhost6 localhost6.localdomain6
192.168.1.144   Node1   Node1.fcicanada.com
192.168.1.145   Node2   Node2.fcicanada.com

Create a new group and user.
groupadd -g 1000 oinstall
useradd -u 1100 -g oinstall oracle
passwd oracle
Create the directories in which the Oracle software will be installed.
mkdir -p /u01/app/oracle/product/fmw11g
mkdir -p /u01/app/oracle/config/domains
mkdir -p /u01/app/oracle/config/applications
chown -R oracle:oinstall /u01
chmod -R 775 /u01/
Append the following entries into the "/home/oracle/.bash_profile" file.
export MW_HOME=/u01/app/oracle/product/fmw11g
export WLS_HOME=$MW_HOME/wlserver_10.3
export WL_HOME=$WLS_HOME
#export JAVA_HOME=/u01/app/oracle/jrockit-jdk1.6.0_45-R28.2.7-4.1.0
export JAVA_HOME= /u01/app/oracle/jre1.8.0_73
export PATH=$JAVA_HOME/bin:$PATH
Install the JDK. Instructions for installing JRockit can be found here. This article will assume JRockit is being used. If you want to use HotSpot for JDK6 or JDK7 you might install them like this.
Installed jrockit
As specified in MOS Note [ID 1487773.1], amend the "/etc/security/limits.d/90-nproc.conf" file, making the following change.
# From
*          soft    nproc     1024

#To
* - nproc 16384
Installation
Run the installer as the "oracle" user.
$ $JAVA_HOME/bin/java -Xmx1024m -jar wls1035_generic.jar
$ # Or
$ $JAVA_HOME/bin/java -Xmx1024m -jar wls1036_generic.jar
Click the "Next" button on the welcome screen.
Welcome
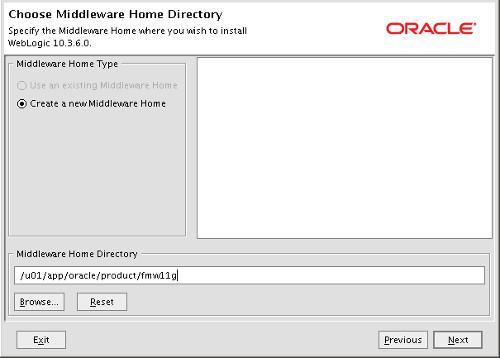
Enter the middleware home ("/u01/app/oracle/product/fmw11g") and click the "Next" button.
Choose Middleware Home Directory
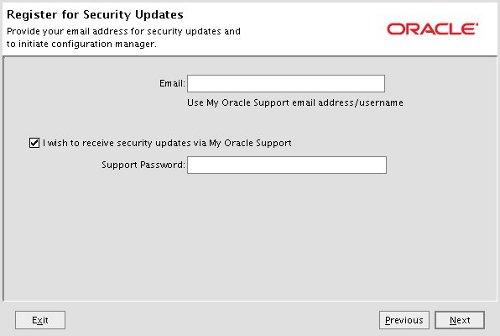
Either enter your support details, or attempt to uncheck the security updates checkbox. The box doesn't actually uncheck, but presents you with a warning dialog. If you click the "Yes" button, indicating you don't want updates, you are returned to the same screen with the box still checked. Click the "Next" button anyway.
Register For Security Updates
Assuming you don't want security updates, click "Yes" and "Yes" on the subsequent warning dialogs and you are presented with the "Connection Failed" screen. Check the "I wish to remain uninformed..." checkbox and click the "Continue" button. This whole process is very confusing at first. Obviously the developers responsible didn't really expect people to say no to security updates!
Connection Failed
Accept the typical setup by clicking the "Next" button.
Choose Install Type
Accept the default JDK selection by clicking the "Next" button.
JDK Selection
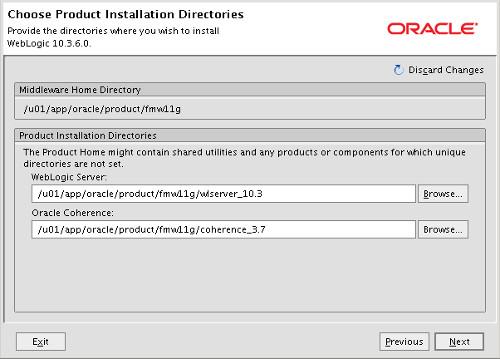
Accept the default product installation directories by clicking the "Next" button.
Choose Product Installation Directories
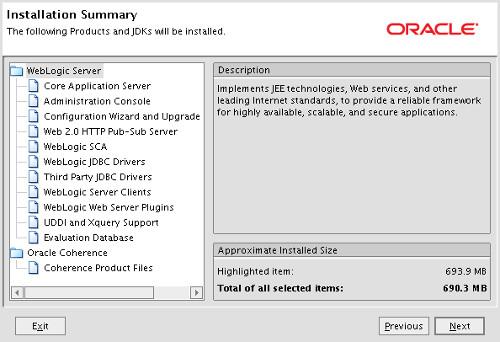
If you are happy with the summary information, click the "Next" button and wait while the installation completes.
Installation Summary
On the installation complete screen, uncheck the "Quickstart" checkbox and click the "Done" button.
Installation Complete

Once the installation is complete on both machines, come back to this article to create the clustered domain.
Consider setting some of the node manager properties on both servers in the "$WLS_HOME/common/nodemanager/nodemanager.properties" file. For example.
$WLS_HOME/server/bin/startNodeManager.sh start node manager to create necessary directories
CrashRecoveryEnabled=true
StartScriptEnabled=true

Create the Clustered Domain

The details of the cluster being built in this article are as follows.
Machines        : Node1.fcicanada.com,
                 Node2.fcicanada.com

Domain Name     : ITRAC


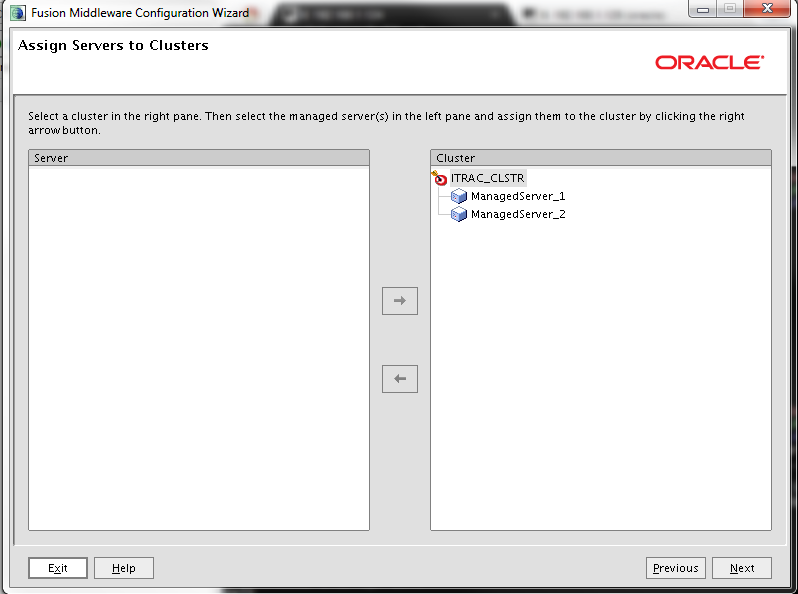
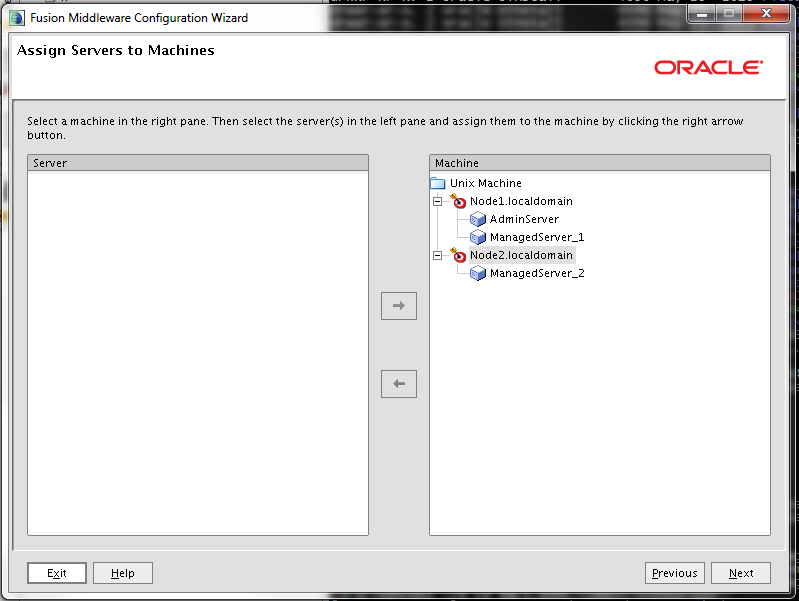
Managed Servers : AdminServer     - Running on Node1.fcicanada.com
                 ManagedServer_1 - Running on Node1.fcicanada.com
                 ManagedServer_2 - Running on Node2.fcicanada.com

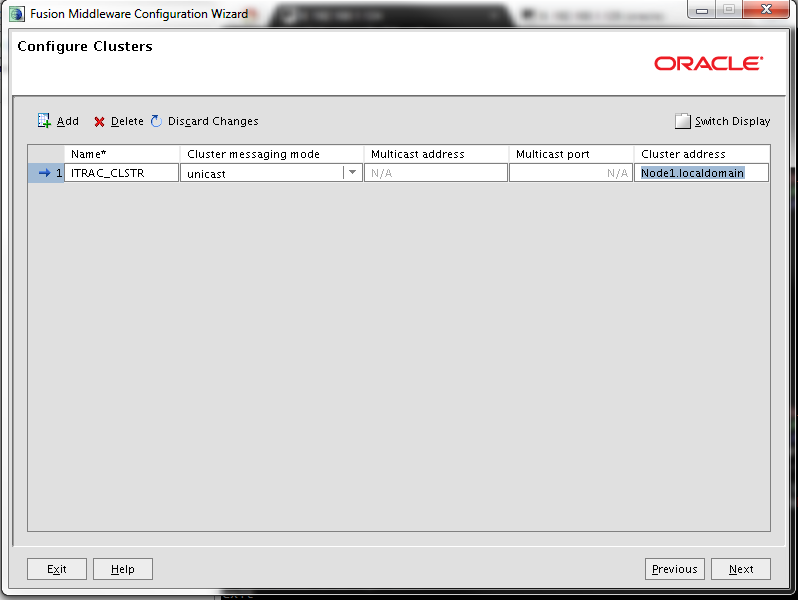
Cluster         : ITRAC_CLSTR
Creation of a clustered domain can be done from the administration console, the command line or the configuration wizard. In my opinion, using the configuration wizard is the quickest way to get the job done. Start the configuration wizard.
$ $WLS_HOME/common/bin/config.sh
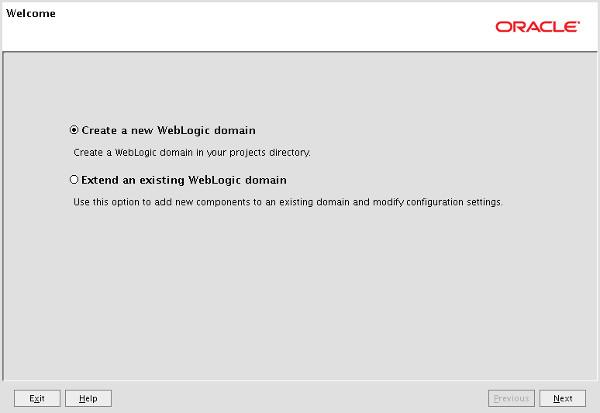
Accept the "Create a new WebLogic domain" option by clicking the "Next" button.
https://oracle-base.com/articles/11g/images/weblogic-cluster/01-welcome.jpg
Select the desired product support and click the "Next" button.
Enter the appropriate domain name and locations, then click the "Next" button.
https://oracle-base.com/articles/11g/images/weblogic-cluster/03-specify-domain-name-and-location.jpg
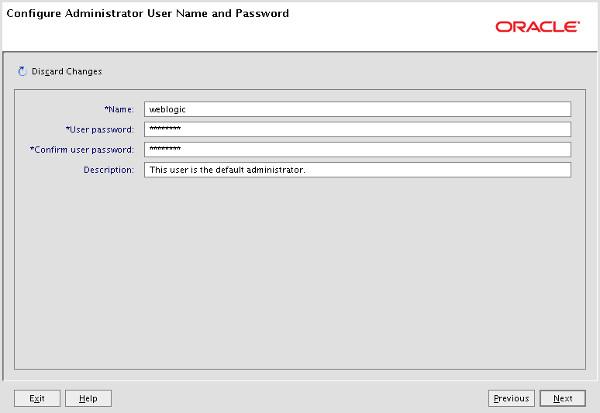
Enter the administrator credentials and click the "Next" button.
https://oracle-base.com/articles/11g/images/weblogic-cluster/04-configure-administrator-username-and-password.jpg
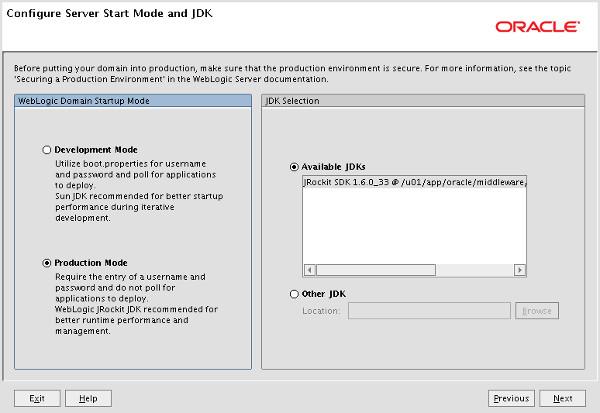
Select the desired server start mode and JDK, then click the "Next" button.
https://oracle-base.com/articles/11g/images/weblogic-cluster/05-configure-server-start-mode-and-jdk.jpg
Select the "Administration Server" and "Managed Servers, Clusters and Machines" options, then click the "Next" button.
https://oracle-base.com/articles/11g/images/weblogic-cluster/06-select-optional-configuration.jpg
Enter the fully qualified machine name, desired port and SSL configuration, then click the "Next" button.
Port : 7002

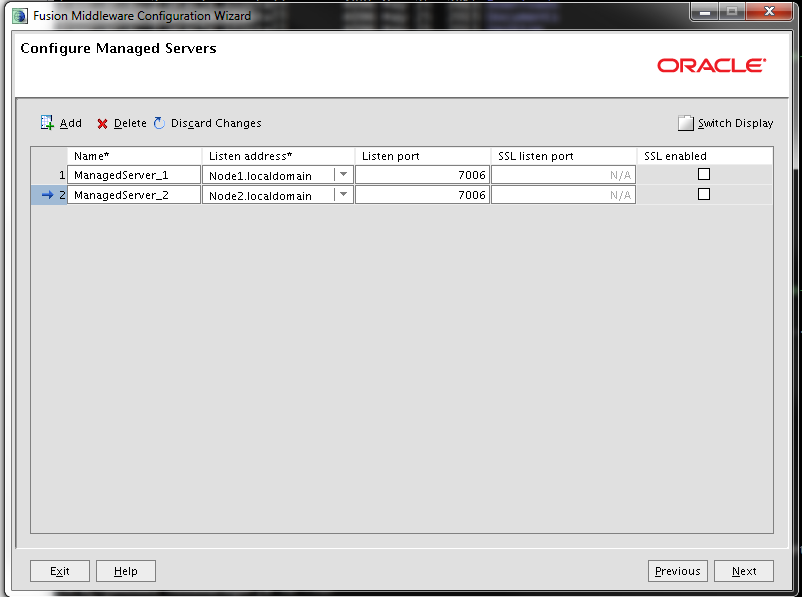
Add the managed servers for the domain. When you are finished, click the "Next" button
Add a cluster entry, remember to add the appropriate cluster address. This can be a comma-separated list of "IP/DNS_Name:port", a DNS name that maps to multiple IP addresses or the local machine if all servers run on one machine. Click the "Next" button.
Associate the managed servers with the cluster and click the "Next" button.
Click the "Unix Machine" tab and add the machines used by the cluster. I've used the fully qualified machine names in all cases. Click the "Next" button.
Assign the managed servers to the machines in the cluster and click the "Next" button.
Check the configuration summary, the click the "Create" button.
https://oracle-base.com/articles/11g/images/weblogic-cluster/13-configuration-summary.jpg
Wait while the domain is created, then click the "Done" button.


If the node manager is not already started on the first server, start it now.
$ nohup $WLS_HOME/server/bin/startNodeManager.sh &
Create a file called "boot.properties" with the following contents. ****start weblogic and shut it down to create necessary directories ***
username=weblogic
password=weblogic1

Start the new domain on the first machine.
$ $MW_HOME/user_projects/domains/ITRAC/bin/startWebLogic.sh > /home/oracle/weblogic.log &

 It may seem odd that you are starting the AdminServer in the new domain, then immediately stopping it in the next section (assuming you do not reset the node manager password), but some of the configuration is not written to the file system until the AdminServer is started for the first time, so don't skip this step.

Reset Node Manager Username/Password

If this is the first domain on the server you might want to consider resetting the node manager credentials. This step is optional, but I feel it is neater if the node manager has different credentials to the administration servers. To reset the credentials, do the following:
  • Log in to the administration server (http://Node1.fcicanada.com:7001/console).
  • In the "Domain Structure" tree on the left, click on the domain name (ITRAC).
  • Click on the "Security" tab. This should automatically put you in the "General" sub-tab.
  • Click the "Advanced" link towards the bottom of the screen.
  • If you are running in production mode, click the "Lock & Edit" button.
  • Enter the "NodeManager Username", "NodeManager Password" and "Confirm NodeManager Password", then click the "Save" button.
  • If you are running in production mode, click the "Activate Changes" button.
**** weblogic/weblogic1***

Stop the new domain on the first machine.

$ $MW_HOME/user_projects/domains/ITRAC/bin/stopWebLogic.sh
/u01/app/oracle/product/fmw11g/user_projects/domains/ITRAC/bin/stopWebLogic.sh

Transfer Domain to Second Machine

We will transfer the relevant configuration using the pack and unpack utilities.
On the first machine, pack the domain configuration using the following commands. Remember to amend theDOMAIN_HOME environment variable and the -template_name parameter to match your domain.
$ export DOMAIN_HOME=$MW_HOME/user_projects/domains/ITRAC
$ cd $WL_HOME/common/bin
$ ./pack.sh -managed=true -domain=$DOMAIN_HOME -template=${DOMAIN_HOME}-template.jar -template_name=ITRAC
[oracle@Node1 bin]$ ./pack.sh -managed=true -domain=$DOMAIN_HOME -template=${DOMAIN_HOME}-template.jar -template_name=ITRAC
<< read domain from "/u01/app/oracle/product/fmw11g/user_projects/domains/ITRAC"
>>  succeed: read domain from "/u01/app/oracle/product/fmw11g/user_projects/domains/ITRAC"
<< set config option Managed to "true"
>>  succeed: set config option Managed to "true"
<< write template to "/u01/app/oracle/product/fmw11g/user_projects/domains/ITRAC-template.jar"
....................................................................................................
>>  succeed: write template to "/u01/app/oracle/product/fmw11g/user_projects/domains/ITRAC-template.jar"
<< close template
>>  succeed: close template

Copy the resulting jar file to the second machine.
$ scp ${DOMAIN_HOME}-template.jar oracle@Node2.localdomain: /u01/app/oracle/product/fmw11g/user_projects/domains
Unpack the configuration on the second machine. Remember to amend the DOMAIN_HOME environment variable to match your domain.
$ export DOMAIN_HOME=$MW_HOME/user_projects/domains/ITRAC
$ cd $WL_HOME/common/bin
$ ./unpack.sh -domain=$DOMAIN_HOME -template=${DOMAIN_HOME}-template.jar

[oracle@Node2 bin]$ ./unpack.sh -domain=$DOMAIN_HOME -template=${DOMAIN_HOME}-template.jar
<< read template from "/u01/app/oracle/product/fmw11g/user_projects/domains/ITRAC-template.jar"
>>  succeed: read template from "/u01/app/oracle/product/fmw11g/user_projects/domains/ITRAC-template.jar"
<< set config option DomainName to "ITRAC"
>>  succeed: set config option DomainName to "ITRAC"
<< write Domain to "/u01/app/oracle/product/fmw11g/user_projects/domains/ITRAC"
...............................................................................................
>>  succeed: write Domain to "/u01/app/oracle/product/fmw11g/user_projects/domains/ITRAC"
<< close template
>>  succeed: close template
Restart the domain on the first machine. Wait until it is fully started before continuing.
$ $MW_HOME/user_projects/domains/ITRAC/startWebLogic.sh

Enroll Second Machine

On the second machine, start WLST.
$ $WLS_HOME/common/bin/wlst.sh
Connect to the administration server manager on the first machine, enroll the current machine, disconnect and exit WLST.
wls:/offline> connect('weblogic', 'weblogic1', 't3://Node1.fcicanada.com:7001')
Connecting to t3://Node1.fcicanada.com:7001 with userid weblogic ...
Successfully connected to Admin Server 'AdminServer' that belongs to domain 'ITRAC'.

Warning: An insecure protocol was used to connect to the
server. To ensure on-the-wire security, the SSL port or
Admin port should be used instead.

wls:/ITRAC/serverConfig> nmEnroll('/u01/app/oracle/product/fmw11g/user_projects/domains/ITRAC','/u01/app/oracle/product/fmw11g/wlserver_10.3/common/nodemanager')
Enrolling this machine with the domain directory at  /u01/app/oracle/product/fmw11g/user_projects/domains/ITRAC ...
Successfully enrolled this machine with the domain directory at /u01/app/oracle/product/fmw11g/wlserver_10.3/common/bin/ /u01/app/oracle/product/fmw11g/user_projects/domains/ITRAC.
disconnect()
exit()
Check the "$MW_HOME/domain-registry.xml" file contains an entry like the following. If it doesn't, add it manually.
<domain location="/u01/app/oracle/product/fmw11g/user_projects/domains/ITRAC"/>
Check the "$WLS_HOME/common/nodemanager/nodemanager.domains" file contains an entry like the following. If it doesn't, add it manually.
ITRAC=/u01/app/oracle/product/fmw11g/user_projects/domains/ITRAC

[oracle@Node2 bin]$ more $MW_HOME/domain-registry.xml
<?xml version="1.0" encoding="UTF-8"?>
<domain-registry xmlns="http://xmlns.oracle.com/weblogic/domain-registry">
 <domain location="/u01/app/oracle/product/fmw11g/user_projects/domains/ITRAC"/>
</domain-registry>
[oracle@Node2 bin]$ more $WLS_HOME/common/nodemanager/nodemanager.domains
#Domains and directories created by Configuration Wizard
#Thu Feb 25 11:40:07 EST 2016
ITRAC=/u01/app/oracle/product/fmw11g/user_projects/domains/ITRAC
If the node manager is not already started on this server, start it now.
$ nohup $WLS_HOME/server/bin/startNodeManager.sh &
Check Node Manager on Each Machine
Check the node manager is reachable on each machine.
  • Log in to the administration server (http://Node1.fcicanada.com:7001/console).
  • In the "Domain Structure" tree, expand the "Environment" node and click on the "Machines" node.
  • In the right-hand pane, click on the first machine (Node1.fcicanada.com).
  • Click on the "Monitoring" tab. Be patient. This may take a little time the first time you do it.
  • If the status is "Reachable", everything is fine.
  • Repeat for the second machines (Node2.localdomain).

Start Up

Provided the node manager is up on all servers, you can now start/stop the managed servers on both machines from the command line. The following example shows how you might do this.
$ # Start on each server.
$ nohup $WLS_HOME/server/bin/startNodeManager.sh > /home/oracle/node.log  &

$ # Start the managed servers from any server.
$ # Requires boot identity file for this to work as a background process.
$ nohup $MW_HOME/user_projects/domains/ITRAC/startWebLogic.sh > /home/oracle/web.log  &
$ nohup $MW_HOME/user_projects/domains/ITRAC/bin/startManagedWebLogic.sh ManagedServer_1 > /dev/null 2>&1 &
$ nohup $MW_HOME/user_projects/domains/ITRAC/bin/startManagedWebLogic.sh ManagedServer_2 > /dev/null 2>&1 &